HOW TO PUT ON SIZE 1-6 CLAWGS V2 FOR THE FIRST TIME:
STEP 1:
PUT ON.
TIGHTEN HEEL STRAPS.
REMOVE FROM PAWS.
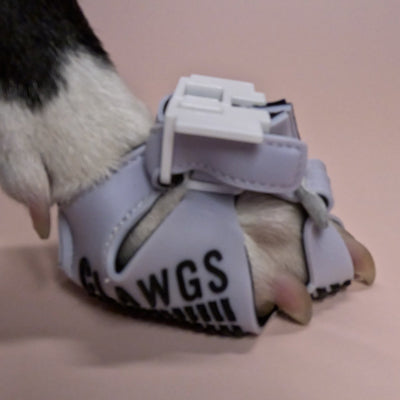
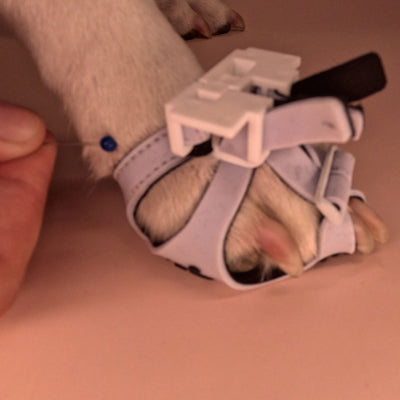
With toe straps loosened, wrap Clawgs' heel straps above paws' sides' bone prominence and below dew claws. Then, fasten the buckle.
With heel straps removed from buckles' second buckle loop and notch, pull both heel straps firmly around paws.
Secure heel straps in buckles' notches.
Then, unfasten buckles and remove Clawgs from legs without adjusting heel strap lengths.
STEP 2:
SLIGHTLY TIGHTEN HEEL STRAPS.
PUSH EXCESS HEEL STRAPS THRU 2ND BUCKLE LOOP.
PULL EXCESS HEEL STRAPS BETWEEN LOOPS THRU 2ND LOOP.
To ensure Clawgs stay above dogs' paws' sides' bone prominence, pull one or two additional heel strap edge stitches through the notch between buckle loops.
Then, insert heel strap end through the second buckle loop. Pull excess heel strap slack between the two buckle loops through second buckle loop.
IMPORTANT:
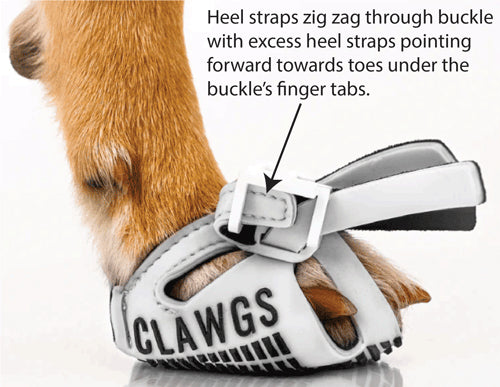
Secured excess heel straps must point forward (toward toes) under buckles' finger tabs.
Pull excess heel strap slack that's between the two buckle loops through the second buckle loop.
If there's excess heel strap slack between the two buckle loops, it'll slide through the first buckle loop, which loosens Clawgs and may cause them to fall off.
STEP 3:
PULL FRONT EDGE UNTIL PAWS' SIDES' BONES STOP HEEL STRAPS.
Put Clawgs back on above paws' sides' bone prominence and below dew claws.
If front toes aren't held in Clawgs' front straps, pull Clawgs' front edge forward until paws' sides' bones prevent heel straps from sliding further forward. You can feel paws' sides' bone prominences on paws' sides near paws' joints.
The buckle should rest flat on the side straps, which rest on paw tops.
STEP 4:
TIGHTEN FRONT STRAPS.
While dogs are STANDING on a solid surface, pull each excess front strap until the front straps hug the front of dogs' front toes' pads.
Excess front straps are the two middle straps that exit the buckles' fronts and have textured tips.
STEP 5:
CENTER CLAWGS ON PAWS.
TIGHTEN SIDE STRAPS.
Center Clawgs on paws while focusing on side toes' and claws positions with respect to Clawgs' sole.
Clawgs' sides should be positioned to cover the front sides of side toes.
It is normal for one or both side claws to touch or hover over Clawgs' sole.
Pull both side straps until they gently hug the front sides of both side toes.
DO NOT
OVERTIGHTEN
SIDE STRAPS.
The side strap elasticity is meant to let side toes spread, not squeeze toes.
Dogs don't like their paws squeezed from the sides.
GO FOR A WALK!
It's normal for dogs to try to remove Clawgs when they have nothing else to do. By leashing dogs and taking them for a walk as soon as you put Clawgs on, dogs are distracted and actively using their Clawgs, so they are less likely to try to remove them.
We recommend starting with leashed walks, frequent inspections, and making adjustments as needed.
Dogs are comfortable in Clawgs and capable of running almost instantly, but please take things slow until you're confident Clawgs are properly adjusted on every paw.
How To Assess Clawgs V2 Sizes
When Clawgs' heel straps fall below dogs' paws' sides' bone prominence, you get a false front edge, which appears correct, but is too small.
Feel where dogs' paws' sides' bone prominence is in relation to Clawgs' heel straps.
Troubleshooting Clawgs V2
If Clawgs' heel straps slide below dogs' paws' sides' bone prominence, pull one or two additional heel strap edge stitches through the buckle.
Make sure the heel straps zig zag through the buckles' loops
-and-
the heel strap slack between the two buckle loops is pulled through the second buckle loop.
CLAWGS V2 ALTERATIONS & BEAUTIFICATIONS:
Make Clawgs V2 prettier, and most importantly, perform better for your best friend ♡