HOW TO PUT ON CLAWGS V3 FOR THE FIRST TIME:
SETUP:

Unfasten the buckle and Velcro straps.
Turn Clawgs' heel and front claws' opening inside out.
This makes it easier to put Clawgs on by reducing the chances of Velcro unintentionally attaching to each other.
STEP 1:
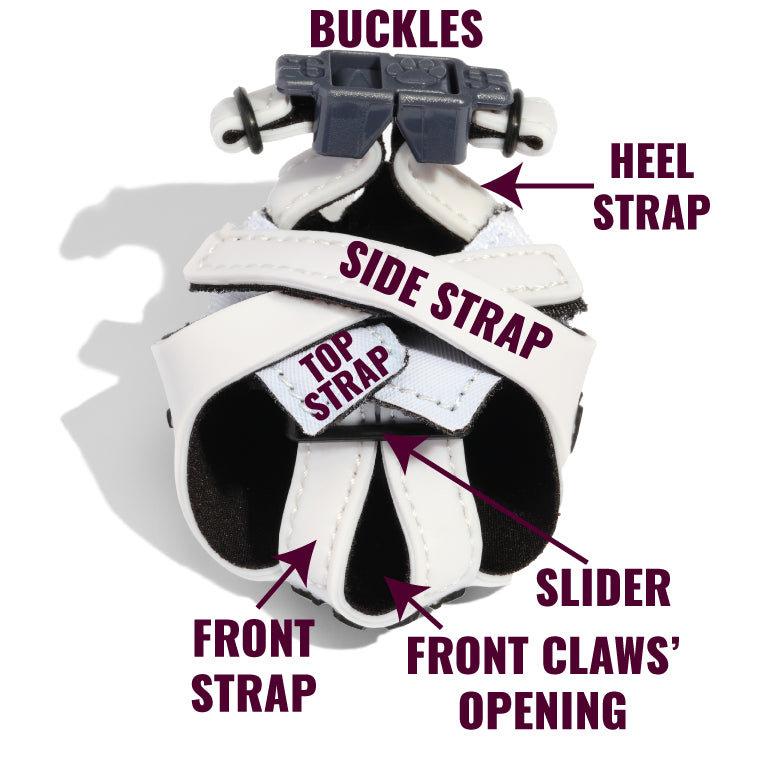
WRAP HEEL STRAPS
FULLY TIGHTEN HEEL STRAPS
REMOVE CLAWGS FROM PAWS
Wrap heel straps just below dew claws and above paws' sides' bones (which you can feel on paw sides near paw tops).
Fasten the buckle.
Fully tighten heel straps.
Heel straps must be tight!
It's normal to see skin / fur enter the gap between buckles while tightening.
Then, unfasten the buckle and take Clawgs off paws!
If the dog does not have dew claws, wrap paws high above paw joints but below "wrist / ankles" joints.
Fasten the buckle.
Fully tighten heel straps.
Heel straps must be tight!
It's normal to see skin / fur enter the gap between buckles while tightening.
Then, unfasten the buckle and take Clawgs off paws!
STEP 2:
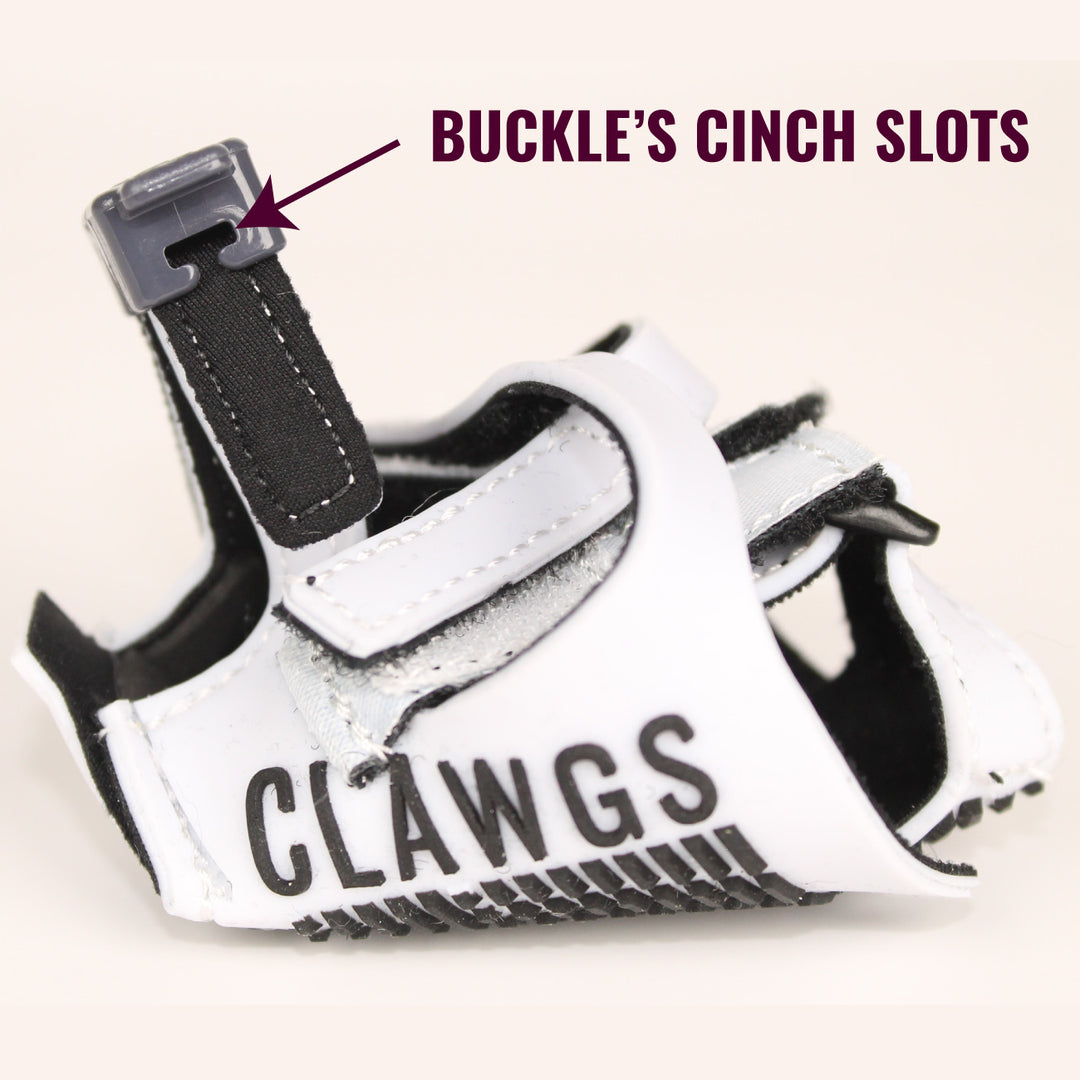
SECURE HEEL STRAPS IN BUCKLES' CINCH SLOTS
IMPORTANT:
With Clawgs off paws, push the heel straps into the buckles' cinch slots.
Problems caused when the heel straps are not locked in the buckles' cinch slots:
- Heel straps can loosen, causing Clawgs to fall off paws.
- Heel straps can slide down below dogs' paws' bone prominences and squeeze toes together that want to spread when dogs stand, which causes discomfort. This also gives Clawgs a false front edge, which makes people think they are the correct size when they are actually too small.
- Heel straps could slide further up paws than they should, making Clawgs appear to be the correct size when in fact they are too large.
- Heel straps can rub up and down on paws rather than holding them securely.
- Clawgs are more likely to spin off center because dogs' heels are not fully set back into Clawgs' heels, which requires Clawgs' to be snug on standing paws from front to back, which requires heel straps' top edges' stitches to firmly hold paws above the paws' sides' bone prominences.
STEP 3:
PUT CLAWGS BACK ON PAW
SLIDE HEEL STRAPS DOWN
INSERT DOG'S FRONT (MIDDLE) CLAWS THROUGH CLAWGS' MIDDLE OPENING
With heel straps secured in the buckles' cinch slots, put Clawgs back on. On paws with dew claws, slide heel straps up under the dew claws and fasten the buckle.
Then slide the heel straps until the paw's sides' bones prevent the heel straps from sliding further down.
On paws without dew claws, wrap the heel straps high and fasten the buckle.
Then slide the heel straps until the paw's sides' bones prevent the heel straps from sliding further down.
Lift the paw and insert the front claws through Clawgs' front claws' opening.
Pull Clawgs front edge forward to set dogs' heels all the way back into Clawgs' heels.
If the heel straps slide below paw side bones while pulling the front edge, the heel straps are too loose. Remove the Clawgs and slightly tighten the heel straps by pulling one or two additional heel strap edge stitches through the buckle's cinch slots.
NOTE: When heel straps are fully tightened
- and -
secured in the buckles' cinch slots, Clawgs stay on paws, even with unfastened toe straps.
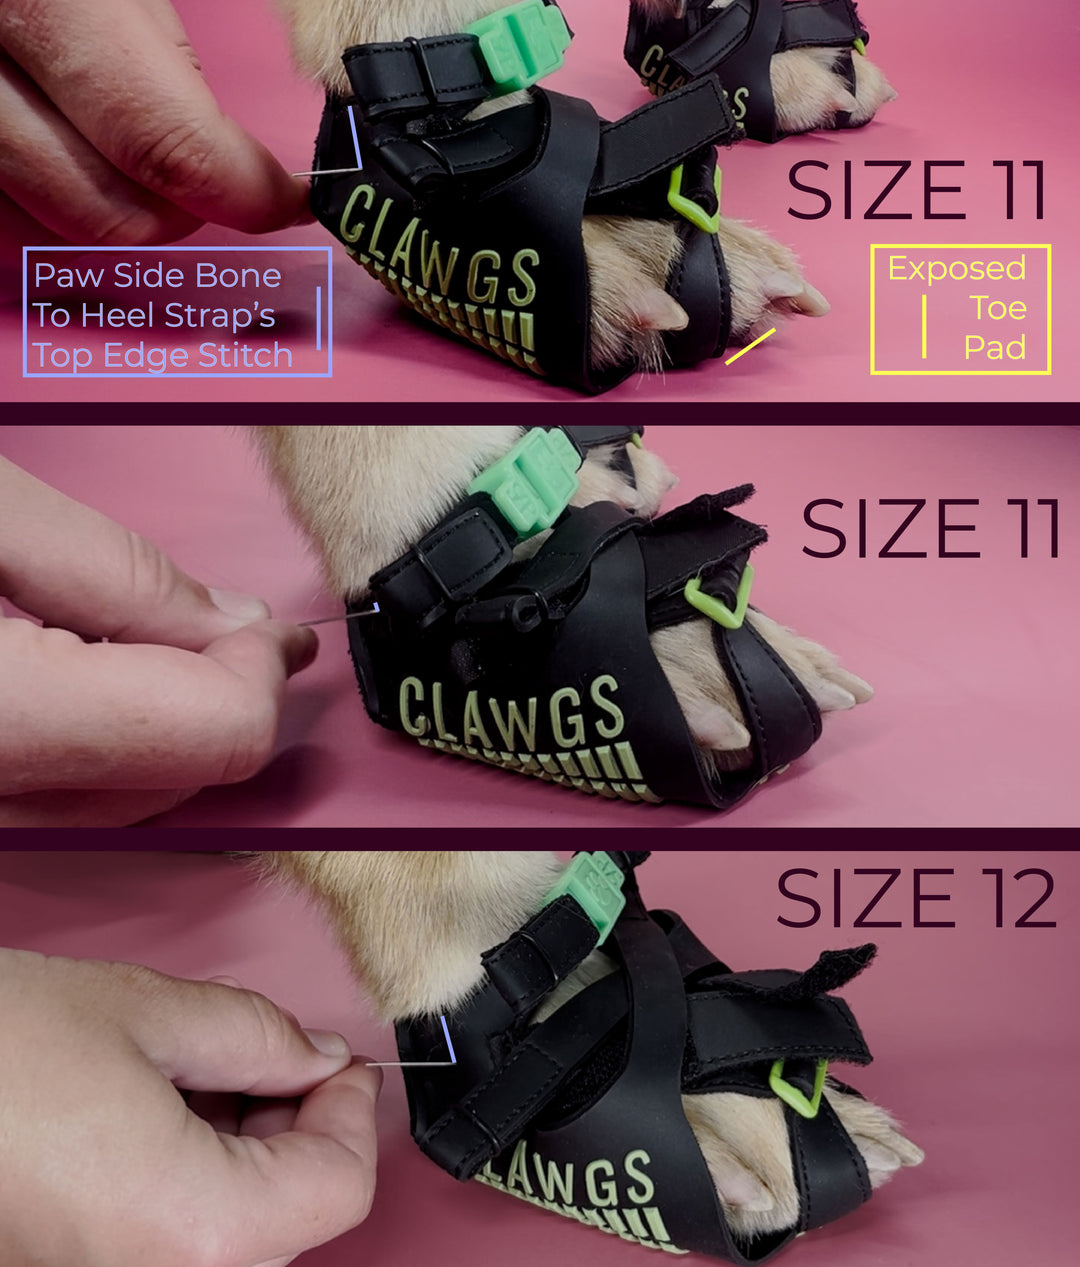
NOTE: Heel straps' position with respect to paw side bones' location directly effects Clawgs' front edge location with respect to front toe pads' location.
STEP 4:
ADJUST THE SLIDER TO BE ON DOG'S FRONT (MIDDLE) KNUCKLES
Adjust Clawgs' plastic slider to be on, or slightly below, the dog's front (middle) knuckles, but above the dog's front claws.
NOTE: The sliders' middle bars are raised and the outer bars are cushioned underneath by the front straps. Therefore, the front straps under sliders touch paws when properly adjusted, not sliders/
If it's too difficult to adjust the slider while it's on the paw, note the adjustments you'd like to make. remove the Clawg, adjust the slider while it's off the paw.
Use the treads' middle line as a guide to center the slider on front straps.
Then, put the Clawg back on the paw by repeating Step 3.
STEP 5:
PRESS SLIDER AGAINST FRONT KNUCKLES
ANGLE FRONT STRAPS TOWARDS TOP STRAPS
TIGHTLY FASTEN TOP STRAPS TO FRONT STRAPS
With dogs' heels set all the way back back into Clawgs' heels,
press and hold the slider against front knuckles with one hand,
angle front straps toward top straps,
then fasten the top straps to front straps as tight as possible while dogs are standing.

The front straps tips may need to go under Clawgs' top sides' Velcro-less area to fully tighten front straps.
Note:
It's best to fasten Clawgs' Velcro toe straps while dogs are standing.
Toes spread when dogs stand and recede into Clawgs when dogs lay or lift paws.
If you're putting Clawgs on a lying down dog, leave the Velcro toe straps slightly loose so toes can spread when dogs stand. Then, assess and readjust toe straps when dogs stand but before adventuring.
IMPORTANT:
To keep Clawgs centered on paws, they must be tight from front to back while dogs are standing.
It is critical that you press and hold the slider against knuckles while fastening front straps to top straps as tight as possible.
STEP 5:
FASTEN SIDE STRAPS TO TOP STRAPS
With front toes secured, focus on side toes and claws.
Center Clawgs with respect to side toes and ensure side claws are not stuck under front straps.
Fasten side straps with the goal of (at most) gently holding the front sides of side toes (near side claws) while dogs are standing.
If you fasten side straps to gently hold side toes while dogs are lying down or lifting their paws, they will be too tight when dogs stand because toes spread when dogs stand.
DO NOT OVERTIGHTEN THE SIDE STRAPS!
Dogs hate their toes being squeezed from the sides.
Side strap stretchiness is intended to let dogs' toes spread, not squeeze them together.
It is better to leave side straps way too loose than slightly too tight.
The side straps main purpose is to prevent debris from getting in.
Overtightening side straps typically wedges side toes forward rather than holding them back.
Tightening the FRONT STRAPS (not side straps) has the biggest impact on preventing Clawgs from spinning.
GO FOR A WALK!
It's normal for dogs to try to remove Clawgs when they have nothing else to do. By leashing dogs and taking them for a walk as soon as you put Clawgs on, dogs are distracted and actively using their Clawgs, so they are less likely to try to remove them.
We recommend starting with leashed walks, frequent inspections, and making adjustments as needed.
Dogs are comfortable in Clawgs and capable of running almost instantly, but please take things slow until you're confident the correct size Clawgs are properly adjusted on every paw.
TAKE CLAWGS OFF
The quickest way to remove Clawgs is to unfasten the buckle by pressing both buckle sides' finger tabs. Then, lift paws and slide Clawgs off.
Alternatively, unbuckle and unfasten all straps to let dogs step out of Clawgs.

How To Assess Clawgs V3 Sizes
Don't get fooled by false front edges!
How To Put On Clawgs V3 After The First Time
It's quick and simple to wrap paws in Clawgs after the initial adjustments
Troubleshooting Clawgs V3
Small adjustments can make a huge difference in Clawgs' performance and dogs' comfort.